
Collect More Data to Unlock Advanced Reporting
The BlockCMS Booking Integration is deeply integrated with Google Analytics to provide ecommerce events throughout the customer journey. By default, this data unlocks substantial additional reporting in Google Analytics. In addition, you can access this data to build custom reports and drive your marketing strategies.
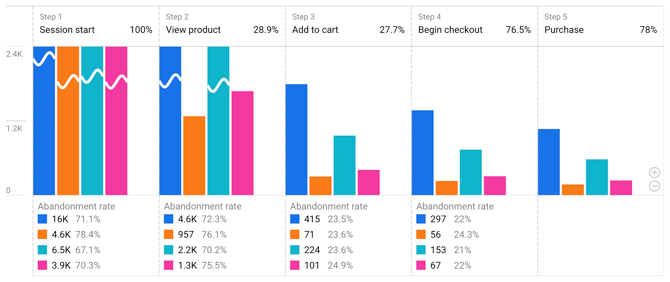
Purchase Journey & Cart Abandonment
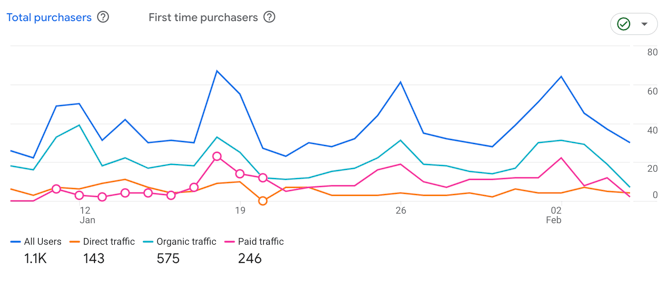
Purchaser Source - Paid vs Organic
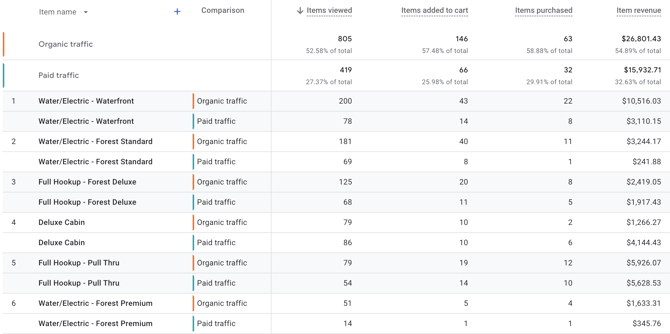
Items Purchased by Traffic Source
And More!
These reports are just examples of what is possible with ecommerce data. There are several more reports offered out-of-the-box and you can custom build anything to best meet your businesses needs.
How To Set Up Tag Manager & Google Analytics for BlockCMS Ecommerce Reporting
Follow these steps to funnel all Google Analytics data, including ecommerce events, from BlockCMS.
Before you begin
The following items are prerequisites to the setup process:
- Log in to your Google Tag Manager account, or create a new one
- Log in to your Google Analytics account, or create a new one
Connect Tag Manager to Google Analytics
- In Tag Manager, go to Tags and click New
- Configure the tag as follows:
- Title: Init GA4
- Tag Configuration
- Tag Type: Google Tag
- Tag ID: Insert your GA4 tag ID (will look like, G-ABCDEF1234). Find your Google Analytics Tag ID
- Triggering: Initialization - All Pages
Create Ecommerce Events Tag
- In Tag Manager, go to Tags and click New
- Configure the tag as follows:
- Title: Ecommerce Events
- Tag Configuration
- Tag Type: Select Google Analytics, then: Google Analytics: GA4 Event
- Measurement ID: The same ID used for the Init GA4 tag above
- Event Name:
{{Event}} - More Settings > Ecommerce: Check the "Send Ecommerce data" box, data source is: Data Layer
- Triggering
- Click Triggering box and then the + icon to create a new trigger
- Trigger Configuration
- Title: Any Ecommerce Event
- Trigger Type: Custom Event
- Event Name: (select the entire value in the box below)
view_item_list|select_item|view_item|add_to_cart|remove_from_cart|begin_checkout|add_shipping_info|add_payment_info|purchase
** Check "Use regex matching" box
-
-
-
-
- This trigger fires on: All Custom Events
-
-
-
Connect Ads Accounts to Ecommerce Values and Events
If you would like to connect your ad accounts such as Google Ads, Meta Ads, Pinterest, Tiktok, etc, create the following variables and events as a prerequisite.
Create Variables
In Tag Manager, go to Variables and create the following User-Defined Variables.
For all variables, the following is consistent:
- Variable Type: Data Layer Variable
- Data Layer Version: Version 2
Create new variables for each of these items:
| Title | Data Layer Variable Name |
| Ecommerce Currency | ecommerce.currency |
| Ecommerce Email | ecommerce.email |
| Ecommerce First Name | ecommerce.firstName |
| Ecommerce Last Name | ecommerce.lastName |
| Ecommerce Transaction ID | ecommerce.transaction_id |
| Ecommerce Value | ecommerce.value |
Create Events
In Tag Manager, go to Triggers and create the following.
For all triggers, the following is consistent:
- Trigger Type: Custom Event
- This trigger fires on: All Custom Events
- For event name, do not select "Use regex mapping"
Create new triggers for each of these items:
| Title | Event name |
| Add To Cart | add_to_cart |
| Purchase Event | purchase |
Set Up Google Ads Conversions
Follow these steps to connect your Google Ads account to purchase conversions.
Connect Google Ads to Tag Manager
- In Tag Manager, go to Tags and click New
- Configure the tag as follows:
- Title: Init Google Ads
- Tag Type: Google Tag
- Tag ID: Find your Google Ads Tag ID, likely starts with "AW-"
- Triggering: Initialization - All Pages
Google Ads Purchase Conversion
- In Tag Manager, go to Tags and click New
- Configure the tag as follows:
- Title: Google Ads Purchase Conversion
- Tag Type: Select Google Ads, then Google Ads Conversion Tracking
- Create the "Conversion Linker" tag if it prompts you to do so. Can use default settings.
- Conversion ID, Conversion Label: Find these values within your Google Ads account.
- Conversion Value:
{{Ecommerce Value}} - Transaction ID:
{{Ecommerce Transaction ID}} - Currency Code:
{{Ecommerce Currency}} - Provide product-level sales data: Yes, source Data Layer
- Provide new customer data: Yes, source Data Layer
- Triggering: Purchase Event
Set Up Meta Ads Conversions
Follow these steps to connect your Meta Ads account to ecommerce conversions.
Connect Meta to Tag Manager
- In Tag Manager, go to Tags and click New
- Configure the tag as follows:
- Title: Meta Pixel
- Tag Type: Custom HTML
- HTML: Find your Meta Pixel script and paste the code
- Advanced Settings: Tag Firing Options: Once per page
- Triggering: All Pages
Meta Ads Purchase Conversion
- In Tag Manager, go to Tags and click New
- Configure the tag as follows:
- Title: Meta Purchase Conversion
- Tag Type: Custom HTML
- HTML: Copy the code below:
-
<script>
  fbq('track', 'Purchase', {currency: "USD", value: {{Ecommerce Value}}});
</script>
-
-
- Triggering: Purchase Event
Meta Add To Cart Conversion
- In Tag Manager, go to Tags and click New
- Configure the tag as follows:
- Title: Meta Add To Cart
- Tag Type: Custom HTML
- HTML: Copy the code below:
-
<script>
  fbq('track', 'AddToCart', {currency: "USD", value: {{Ecommerce Value}}});
</script>
-
-
- Triggering: Add To Cart
Import Prebuilt Container
Follow these steps to import the tag configurations. First step is to import the configurations, then you must go into some of the tags and add/update the IDs specific to your organization.
Step 1: Import Configurations
- Download (right click, Save As): this JSON import file
- Log in to Google Tag Manager. Navigate to: Admin > Import Container
- For the "Choose container file" input, select the downloaded JSON file from step 1
- Choose Merge and Rename conflicting tags
- Click: Add to Workspace
Step 2: Update Tags
Follow these steps to ensure your tags are properly configured.
Init GA4 and Ecommerce Events
The prebuilt container includes a "Init GA4" tag to install GA4 into your Tag Manager. If GA4 is already running in your GTM, delete the tag created by the import and keep the tag that already exists in the container.
If you do not have a GA4 tag in your container yet - update "Init GA4" to use the correct Tag ID: Find your Google Analytics Tag ID
Also be sure to update the "Ecommerce Events" tag to use you GA4 Tag ID, the same used in your Init GA4 (or existing) tag.
Init Google Ads
The prebuilt container includes a "Init Google Ads" tag to install Google Ads into your Tag Manager. If Google Ads are already running in your GTM, delete the tag created by the import and keep the tag that already exists in the container.
If you do not have a Google Ads tag in your container yet - update "Init Google Ads" to use the correct Tag ID: Find your Google Ads Tag ID
Meta Pixel
The prebuilt container includes a "Meta Pixel" tag to install Meta tracking into your Tag Manager. If there is already a Meta tag in your GTM, delete the tag created by the import and keep the tag that already exists in the container.
If you do not have a Meta Pixel tag in your container yet - update "Meta Pixel" to use the correct Pixel script: Find your Meta Pixel script